Setting Up
Setting Up Your Computer
Homestead
Turning on Homestead
cd ~/Homestead
vagrant up
Configuring Homestead
cd ~/.homestead
gedit Homestead.yaml
Configuring Shared Folders
Read more about Homestead here
- Scroll down to the
foldersproperty in yourHomestead.yamlfile. - For example:
The main folder where you put your projects into is a folder namedProjects.
- The folder is located at
~/Documents/Projectson your computer. - You want to set up a folder named
Projectsin root of the Vagrant box to contain your project folders.
This is how you would configure your Vagrant box inside yourHomestead.yamlfile:
- The folder is located at
  folders:
    - map: ~/Documents/Projects //This is the Projects folder location on your computer
      to: /home/vagrant/Projects //This is the Projects folder location inside Vagrant.
Configuring sites
Note
The location of your Vagrant folder may vary based on what you set up in the Configuring Shared Folders step. In our example above, we mapped the Vagrant folder to /home/vagrant/Projects, so our site mapping is pointed towards a folder in that location, therefore /home/vagrant/Projects/myproject
- Scroll down to the
sitesproperty in yourHomestead.yamlfile - For example, if you want to map your project, named “My Project” to a domain called
myproject.test, which is in the/myprojectfolder in your shared folder, this is how you would configure it in your Homestead.yaml file:
sites:
  - map: myproject.test //The domain you'll use to access your "served" site locally
    to: /home/vagrant/Projects/myproject //The location of your project's folder in your Vagrant box
Remember to edit your hosts file
Configuring databases
Depending on what you initially named your database during project setup, this is how you can add your database to Homestead:
- In your
Homestead.yamlfile, navigate to thedatabasesproperty:
databases:
    - myproject
Editing the hosts file
- Navigate to and open your hosts file
bash cd /etc gedit hosts - Add the domain you configured to the end of the file, like this:
192.168.10.10 myproject.test
Reprovision Homestead
Important
Make sure Homestead is already running before you reprovision Homestead.
Do this every time you edit your Homestead.yaml file.
cd ~/Homestead
vagrant reload --provision
Connecting to Homestead via SSH
Make sure Homestead is running
cd ~/Homestead
vagrant ssh
Setting Up A New Project
Laravel
Before starting your project
- Copy .env.example and rename it to .env
- Edit the contents of the .env file:
- APP_KEY
- DB_DATABASE
Set Up Laravel (Optional)
- SSH into Homestead
cdinto project directory- Run command:
bash
laravel new [sitename]
Database
Create Database
cPanel
Assign user to database
Generate Key (for .env file)
- Run command
php artisan key:generate
- Copy the generated key into the .env file.
Project Dependencies
Install project dependencies
composer install
Style Guide
IDE
Download our PHPStorm shared settings
PHP
Follow PSR1/PSR2
JavaScript
Follow JavaScript Standard Style
HTML/CSS
Loosely follow Google HTML/CSS Style Guide
SASS
Loosely follow SASS Guideline
Development
Workflow
Set Up BrowserSync
- Find
webpack.mix.jsin your project. - Paste this line at the end of the file:
browserSync('gigpick.app');
Your file should now look like this:
    const { mix } = require('laravel-mix');

    mix.js('resources/assets/js/app.js', 'public/js')
    .sass('resources/assets/sass/app.scss', 'public/css')
    .browserSync('gigpick.app');
Compile Project Assets
In your assets folder, run:
npm install
npm update
npm run dev
npm run watch
Importing projects
Importing General Projects
Importing the existing project
Clone the existing project folder into the shared vagrant folder (defined during Homestead Setup)
Edit homestead.yaml file
Map to the new project and its database in your homestead.yaml file.
Reload vagrant
Run vagrant reload --provision
Wordpress Projects
Importing Wordpress projects
- Clone the project (via git or otherwise) into the shared vagrant folder (defined during Homestead setup)
- Create the
wp-config.phpfile.
In the project’s root, find thewp-config-sample.phpfile (the file name may vary), duplicate it, and change the duplicate’s name fromwp-config.sample(1).phptowp-config.php. - Set up Homestead
3.1 Edit yourHomestead.yamlfile and
- Map a domain to the location of the project folder in vagrant under the
sitesproperty - Add the database name to the
databasesproperty.
- Map a domain to the location of the project folder in vagrant under the
Set up wordpress’ database
4.1 In thewp-config.phpfile that you just created,- find the line that defines the database name and
- change the second value to reflect your database name (which should be the same name as the database name that you added to your
Homestead.yamlfile).
For example, if the database name ismyproject, then the line should be edited todefine('DB_NAME', 'myproject');
4.2 To connect the database to a remote one,
- edit the
define('DB_HOST', 'localhost');line. - Change the
localhostvalue to one in this format:localIP:DB_Port.
For example:192.168.0.XXX:33060.
Note: Check your database’s port number here
- find the line that defines the database name and
Wordmove
Installing Wordmove on
Vagrant
- In your Homestead directory, run
vagrant sshto ssh into your virtual machine. - Install rbenv and ruby (~>v2.4.0) in your virtual machine
Install wordmove from inside vagrant:
gem install wordmoveOR- Install outside of vagrant:
cdinto your Homestead directory- run
vagrant up - run
vagrant install plugin wordmove
Local Machine
- Install rbenv and ruby (~>v2.4.0)
- Run
gem install wordmove
Setting Up an Existing Project Using Wordmove
1. Import the project
2. Edit homestead.yaml
3. Reload vagrant
4. Init + Edit MoveFile
In the project’s root directory,
1. Run wordmove init to create a movefile in the root of the project.
2. Open the generated movefile and edit its contents to match whatever credentials were given.
5. Pull the Database
vagrant ssh
cd path/to/project
wordmove pull -e staging -d
Working with Visual Composer
Add a new element/component
Shortcodes file structure best practices:
- wp-content/themes/themeName/
shortcodesfolder - wp-content/themes/themeName/
vc_templatesfolder - wp-content/themes/themeName/
functions.phpfile - wp-content/themes/themeName/
setup/themeName_vc.phpfile
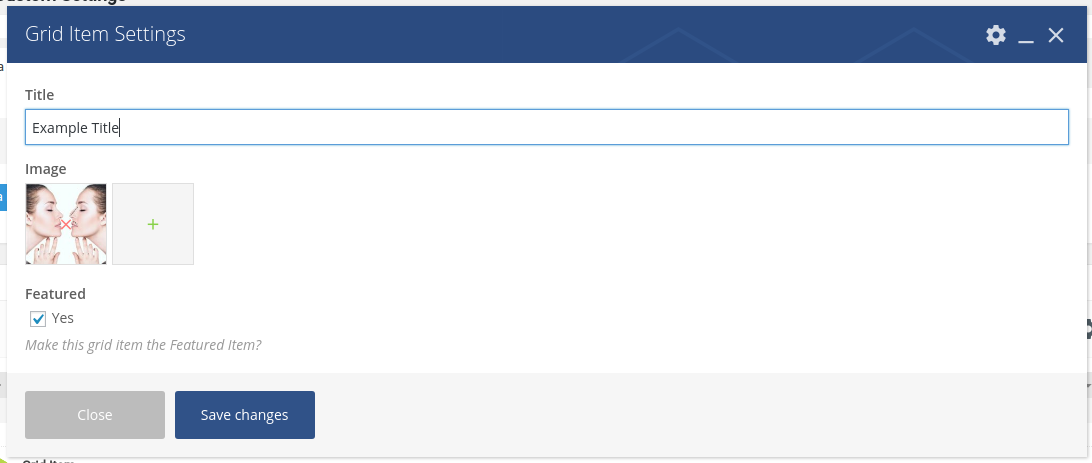
Case: Create a visual composer element called “Banner” that has a textfield and an image selector that outputs a banner-like element on the page
Visual Composer Element Settings
Sample Output

- In
functions.php
Set up theme’s class and registerthemeName_vc.phpfile
//functions.php
<?php
  require_once('setup/themeName_vc.php');

  $theme = new themeName();
  $theme->init();
- In
/setup/themeName_vc.php
- Define theme’s class
- Define
add_shortcodesfunction (this is where we add and register our shortcodes) - Define
configure_elementsand call the function on thevc_after_inithook - Define a function called
configure_banner()(replace “banner” with your shortcode’s name)
//setup/themeName_vc.php
<?php
  class themeName_vc {
    function init() {
      $this->add_shortcodes();

      add_action('vc_after_init', [$this, 'configure_elements']);
    }

    function add_shortcodes() {
      //register shortcodes
    }

    function configure_elements() {
      //define vc elements

      $this->configure_banner(); //(replace "banner" with your shortcode's name)
    }

    function configure_banner(){
      //register vc elements
    }
  }
- Register shortcode
- Create a file called
banner.php(replace “banner” with your shortcode’s name) in theshortcodesfolder - Register the shortcode in
themeName_vc.php
- Create a file called
  //themeName_vc.php

  function add_shortcodes() {
    //replace 'themeName_banner' with the name of your shortcode
    add_shortcode('themeName_banner', function($params) {
      include(get_template_directory_uri() . '/shortcodes/banner.php') //replace banner.php with your shortcode's filename
    })
  }
Note: At this point, you’ve registered a shortcode that can be inserted into Wordpress admin pages’ text editors like this: [shortcode_name]. In this example, it’ll be [themeName_banner].
Since your shortcode file is empty, nothing will appear on the page. You’ll need to edit the contents of your shortcode file first.
Register VC component Registering a component is different from defining a shortcode in the way that this creates the element’s UI that appears in Visual Composer.
- Create a file called
vc_banner.php(replace “banner” with your shortcode’s name) inside yourvc_templatesfolder. - Register the file in your
themeName_vc.phpfile
- Create a file called
  <?php
  //themeName_vc.php
  function configure_banner() {
    include(get_template_directory_uri() . '/vc_templates/vc_banner.php'); //replace vc_banner.php with your vc components's filename
  }
- Edit your vc component file
Read more here
  <?php
  //vc_templates/vc_banner.php
  vc_map(
    [
      "name" => __("Banner"), //Component name
      "base" => "themeName_banner", //shortcode
      "content_element" => true, //whether or not it appears in the "content" tab
      "category" => __("Your Theme Name"), //Make your element appear in a custom tab
      "params" => //the fields
        [
          [
            "type" => "textfield",
            "heading" => __("Title"),
            "param_name" => "title", //variable name
            "description" => __("Title that appears on the banner");
          ],
          [
            "type" => "attach_image",
            "heading" => __("Image"),
            "param_name" => "image",
          ],
        ]
    ]
  )
- Edit your shortcode file
Here, define what your shortcode will do and/or display
  <?php
  //shortcode/banner.php

  //retrieves the values passed into the shortcode via the visual composer's UI, then puts them into variable names that you can access using $leftValue
    extract(shortcode_atts([
      'title' => null,
      'image' => null,
    ], $params));

    //the vc image picker only returns the image's id. use the code below to generate the html with the source correctly linked
    $image = wp_get_attachment_image($image, 'full');

    ?>

    <div class="banner">
      <?= $image >
      <h2><?= $title ></h2>
    </div>
Making parent-child components
Parent-child components described here are elements that can be nested inside each other, usually the children inside the parent or container element.
The process is very similar to adding an element.
You’ll need:
- Two shortcode files, one for the parent and one for the child
- Two vc_template files, one for the parent and one for the child.
- To register the files, both shortcode files in the
add_shortcodes()function, and both vc_template files via theconfigure_elements()function.
In the parent element’s shortcode file
<div class="container">

  <!-- The line of code below tells wordpress to insert the child shortcode -->
  <?= do_shortcode($content); ?>

</div>
In the child element’s shortcode file
Write the behaviour of the child element here. The contents of this file can be similar to an independent shortcode
In the Parent element’s vc_template file
//vc_templates/vc_parent.php
<?php
  vc_map([
    //other parameters
    "as_parent" => ['only'=> 'child_shortcode'],
    "is_container" => true,
    "js_view" => 'VcColumnView',
  ]);

  if ( class_exists( 'WPBakeryShortCodesContainer' ) ) {
    class WPBakeryShortCode_ThemeName_Parent extends WPBakeryShortCodesContainer {
  }
}
In the Child element’s vc_templates file
//vc_templates/vc_child.php
<?php
  vc_map([
    //other parameters
    "as_child" => ['only'=> 'parent_shortcode'],
  ]);

  if ( class_exists( 'WPBakeryShortCode' ) ) {
    class WPBakeryShortCode_ThemeName_Child extends WPBakeryShortCode {
  }
}
Registering the shortcodes
<?php
//themeName_vc.php

  function add_shortcodes()
  {
    add_shortcode('themeName_parent', function($params, $content = null) {
      include(get_template_directory_uri() . '/shortcodes/parent.php') //replace parent.php with your shortcode's filename
    });

    add_shortcode('themeName_child', function($params) {
      include(get_template_directory_uri() . '/shortcodes/child.php') //replace child.php with your shortcode's filename
    });
  }


function configure_elements() {
  //register functions

  $this->configure_parent();
  $this->configure_child();
}

function configure_parent() {
  include(get_template_directory_uri() . '/vc_templates/parent.php')
}

function configure_child() {
  include(get_template_directory_uri() . '/vc_templates/child.php')
}
Working with Laravel Projects
1. Install Project Dependencies
composer install
2. Edit .env File
3. Compile Project Assets
npm run dev
or
npm run watch
4. Migrate Tables
php artisan migrate
Working with Git
Git
Installing git
Setting your git profile on your computer
git config --global user.name "Your Username"
git config --global user.email "[email protected]"
To verify if you have set your credentials correctly:
git config --global user.name
git config --global user.email
To cache your github password (for a default of 15 minutes):
git config --global credential.helper cache
Initiating git in a new project
In your project’s root directory:
git init
Cloning Files from the Git Repo
To clone using HTTP:
git clone https://github.com/code413/example.git
Adding a remote
git remote add https://github.com/code413/example.git
Removing a remote
git remote remove https://github.com/code413/example.git
Commit changes
In the same directory where you initiated git, run:
git add -A
git commit -m "Your commit message"
Check git status
git add -A
git status
Push changes
In the same directory where you initiated git, run:
git push
Pull changes
In the same directory where you initiated git, run:
git pull
Database
Refresh and seed database
php artisan migrate:refresh --seed
Production
Set up a load balancer on Laravel Forge
Laravel Forge is a deployment tool that’s used on some of our sites. To set up a load balancer:
- Log in to Laravel Forge
- Spin up 2+ servers to balance, and give them the same domain name.
2.1 In the servers’ settings, go to the Network section (from the menu on the left) and check the other load balanced server, then “Update Network”. Do this for ALL of the servers that you wish to balance. - Spin up a new server, and check the “provision as load balancer” check box.
- Go into the load balancer server and enter the root domain, the same domain name as the servers you set up in step 2, then click “Add Site”
- Once it’s done provisioning, click the link to the new “site”. In the settings page that appears, check the servers that you wish to balance, then click “Update Balanced Servers”
Set up cron jobs on Laravel Forge
- Log in to Laravel Forge
- Locate the server your project is on
- Navigate to the “Scheduler” from the sidebar
Edit/enter the command. For example, to run scheduled commands for the project named
project.code413.io, enterphp/home/forge/api.code413.io/artisan schedule:run
Note: To check your project’s directory:- SSH into the server
- Navigate to your project
- Use the
pwdcommand to print the full directory to your console.
Change the value in the “User” input if necessary
Select a frequency
Click “Schedule Job”
Once it’s done setting up, you can find the list of cron jobs at the lower part of the page. Click the little green “log” icon towards the right to check if your cron jobs are working.
Deployment
Configure Web Server
Install SSL
Connecting to the production server
Via SSH
ssh username@IP
Via FTP
- Open File Manager on your computer.
- Find the “Connect to Server” button in the leftside panel of the File Manager.
- In the window that appears, enter an address in this format:
ftp://username@IP - Click “Connect”, then enter the server’s password.
Updating document root
/var/cpanel/userdata/USERNAME/DOMAIN.COM
rm -fv /var/cpanel/userdata/USERNAME/DOMAIN.COM.cache
Rebuild Configuration Files
/scripts/updateuserdatacache
/scripts/rebuildhttpdconf
Restart Apache
Go to WMH, search for HTTP Server (Apache) and click the “Restart Server” button Further Reading
Building the Project
- Install Project Dependencies
- Edit .env File
- Compile Project Assets
Migrate Tables
1. Install Project Dependencies
composer install
2. Edit .env File
3. Compile Project Assets
npm run dev
or
npm run watch
4. Migrate Tables
php artisan migrate
Contributing
How to contribute
- Install Hugo
- Clone docs from github
- Project setup
- Working with Hugo
- File structure
- Learn Markdown
- Push changes and update the site
1. Install Hugo
The latest version of hugo seems to work just fine. Download the file and install it like you would any other application. To check if the installation is successful, open a terminal and type hugo version.
3. Project setup
You won’t need to set up Homestead, Hugo is a static file generator and has its own development server.
4. Working with Hugo
hugo server
hugo server starts a development server similar to npm run watch. Any changes made to the files will automatically reflect in the browser.
cdinto the docs folder.- run
hugo server - In your browser, type localhost:1313
hugo
This command generates all the static files required and places them in the docs folder, which is the folder containing everything that’s being served on the site.
Note
!!! Remember to run hugo before you push your changes, or your new content/style changes will not reflect on the site.
5. File Structure
Look in the Contents folder, this is where you’ll be working the most. Each main nav item on the sidebar is in its own folder (setup, development, etc).
There’s a index.md file in each folder. That’s where all the content is.
6. Learn Markdown
Read more about markdown’s syntax here.
All of the h2 or ## headings will automatically be listed as submenu items.
All of the headings will automatically be listed in the table of contents section at the top of each section’s page.
7. Updating the site
When you’re ready to push your update to the live site, run hugo, commit then push your changes.
Troubleshooting
[FIX] ERNOSPC when running npm run watch
The problem stems from the machine’s self imposed limit on how many files it can watch at one time Read more here. To fix, run:
echo fs.inotify.max_user_watches=524288 | sudo tee -a /etc/sysctl.conf && sudo sysctl -p
Flush DNS
Sometimes you might need to flush your PC’ DNS in order to see reflected changes. Use the command below to do that.
sudo systemd-resolve --flush-caches