Development
Workflow
Set Up BrowserSync
- Find
webpack.mix.jsin your project. - Paste this line at the end of the file:
browserSync('gigpick.app');
Your file should now look like this:
    const { mix } = require('laravel-mix');

    mix.js('resources/assets/js/app.js', 'public/js')
    .sass('resources/assets/sass/app.scss', 'public/css')
    .browserSync('gigpick.app');
Compile Project Assets
In your assets folder, run:
npm install
npm update
npm run dev
npm run watch
Importing projects
Importing General Projects
Importing the existing project
Clone the existing project folder into the shared vagrant folder (defined during Homestead Setup)
Edit homestead.yaml file
Map to the new project and its database in your homestead.yaml file.
Reload vagrant
Run vagrant reload --provision
Wordpress Projects
Importing Wordpress projects
- Clone the project (via git or otherwise) into the shared vagrant folder (defined during Homestead setup)
- Create the
wp-config.phpfile.
In the project’s root, find thewp-config-sample.phpfile (the file name may vary), duplicate it, and change the duplicate’s name fromwp-config.sample(1).phptowp-config.php. - Set up Homestead
3.1 Edit yourHomestead.yamlfile and
- Map a domain to the location of the project folder in vagrant under the
sitesproperty - Add the database name to the
databasesproperty.
- Map a domain to the location of the project folder in vagrant under the
Set up wordpress’ database
4.1 In thewp-config.phpfile that you just created,- find the line that defines the database name and
- change the second value to reflect your database name (which should be the same name as the database name that you added to your
Homestead.yamlfile).
For example, if the database name ismyproject, then the line should be edited todefine('DB_NAME', 'myproject');
4.2 To connect the database to a remote one,
- edit the
define('DB_HOST', 'localhost');line. - Change the
localhostvalue to one in this format:localIP:DB_Port.
For example:192.168.0.XXX:33060.
Note: Check your database’s port number here
- find the line that defines the database name and
Wordmove
Installing Wordmove on
Vagrant
- In your Homestead directory, run
vagrant sshto ssh into your virtual machine. - Install rbenv and ruby (~>v2.4.0) in your virtual machine
Install wordmove from inside vagrant:
gem install wordmoveOR- Install outside of vagrant:
cdinto your Homestead directory- run
vagrant up - run
vagrant install plugin wordmove
Local Machine
- Install rbenv and ruby (~>v2.4.0)
- Run
gem install wordmove
Setting Up an Existing Project Using Wordmove
1. Import the project
2. Edit homestead.yaml
3. Reload vagrant
4. Init + Edit MoveFile
In the project’s root directory,
1. Run wordmove init to create a movefile in the root of the project.
2. Open the generated movefile and edit its contents to match whatever credentials were given.
5. Pull the Database
vagrant ssh
cd path/to/project
wordmove pull -e staging -d
Working with Visual Composer
Add a new element/component
Shortcodes file structure best practices:
- wp-content/themes/themeName/
shortcodesfolder - wp-content/themes/themeName/
vc_templatesfolder - wp-content/themes/themeName/
functions.phpfile - wp-content/themes/themeName/
setup/themeName_vc.phpfile
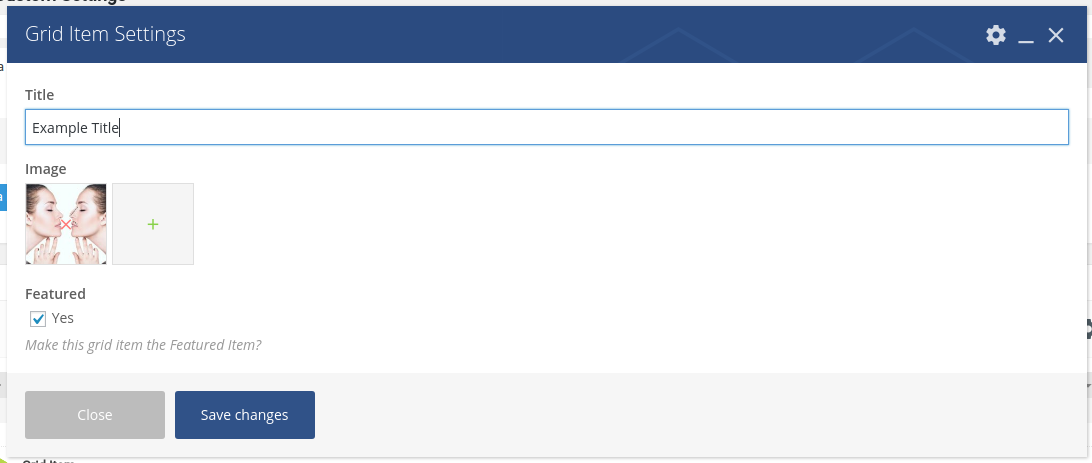
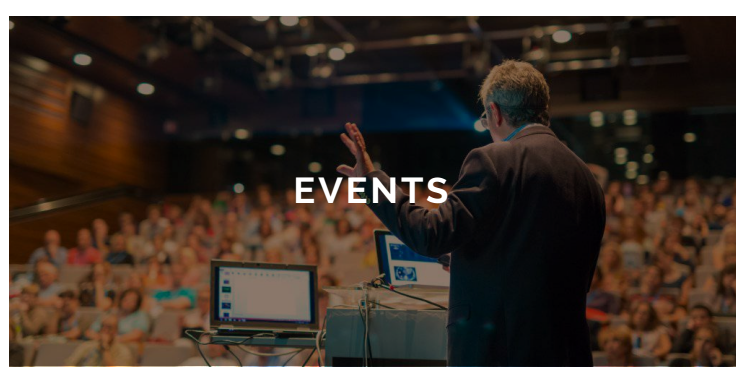
Case: Create a visual composer element called “Banner” that has a textfield and an image selector that outputs a banner-like element on the page
Visual Composer Element Settings
Sample Output
- In
functions.php
Set up theme’s class and registerthemeName_vc.phpfile
//functions.php
<?php
  require_once('setup/themeName_vc.php');

  $theme = new themeName();
  $theme->init();
- In
/setup/themeName_vc.php
- Define theme’s class
- Define
add_shortcodesfunction (this is where we add and register our shortcodes) - Define
configure_elementsand call the function on thevc_after_inithook - Define a function called
configure_banner()(replace “banner” with your shortcode’s name)
//setup/themeName_vc.php
<?php
  class themeName_vc {
    function init() {
      $this->add_shortcodes();

      add_action('vc_after_init', [$this, 'configure_elements']);
    }

    function add_shortcodes() {
      //register shortcodes
    }

    function configure_elements() {
      //define vc elements

      $this->configure_banner(); //(replace "banner" with your shortcode's name)
    }

    function configure_banner(){
      //register vc elements
    }
  }
- Register shortcode
- Create a file called
banner.php(replace “banner” with your shortcode’s name) in theshortcodesfolder - Register the shortcode in
themeName_vc.php
- Create a file called
  //themeName_vc.php

  function add_shortcodes() {
    //replace 'themeName_banner' with the name of your shortcode
    add_shortcode('themeName_banner', function($params) {
      include(get_template_directory_uri() . '/shortcodes/banner.php') //replace banner.php with your shortcode's filename
    })
  }
Note: At this point, you’ve registered a shortcode that can be inserted into Wordpress admin pages’ text editors like this: [shortcode_name]. In this example, it’ll be [themeName_banner].
Since your shortcode file is empty, nothing will appear on the page. You’ll need to edit the contents of your shortcode file first.
Register VC component Registering a component is different from defining a shortcode in the way that this creates the element’s UI that appears in Visual Composer.
- Create a file called
vc_banner.php(replace “banner” with your shortcode’s name) inside yourvc_templatesfolder. - Register the file in your
themeName_vc.phpfile
- Create a file called
  <?php
  //themeName_vc.php
  function configure_banner() {
    include(get_template_directory_uri() . '/vc_templates/vc_banner.php'); //replace vc_banner.php with your vc components's filename
  }
- Edit your vc component file
Read more here
  <?php
  //vc_templates/vc_banner.php
  vc_map(
    [
      "name" => __("Banner"), //Component name
      "base" => "themeName_banner", //shortcode
      "content_element" => true, //whether or not it appears in the "content" tab
      "category" => __("Your Theme Name"), //Make your element appear in a custom tab
      "params" => //the fields
        [
          [
            "type" => "textfield",
            "heading" => __("Title"),
            "param_name" => "title", //variable name
            "description" => __("Title that appears on the banner");
          ],
          [
            "type" => "attach_image",
            "heading" => __("Image"),
            "param_name" => "image",
          ],
        ]
    ]
  )
- Edit your shortcode file
Here, define what your shortcode will do and/or display
  <?php
  //shortcode/banner.php

  //retrieves the values passed into the shortcode via the visual composer's UI, then puts them into variable names that you can access using $leftValue
    extract(shortcode_atts([
      'title' => null,
      'image' => null,
    ], $params));

    //the vc image picker only returns the image's id. use the code below to generate the html with the source correctly linked
    $image = wp_get_attachment_image($image, 'full');

    ?>

    <div class="banner">
      <?= $image >
      <h2><?= $title ></h2>
    </div>
Making parent-child components
Parent-child components described here are elements that can be nested inside each other, usually the children inside the parent or container element.
The process is very similar to adding an element.
You’ll need:
- Two shortcode files, one for the parent and one for the child
- Two vc_template files, one for the parent and one for the child.
- To register the files, both shortcode files in the
add_shortcodes()function, and both vc_template files via theconfigure_elements()function.
In the parent element’s shortcode file
<div class="container">

  <!-- The line of code below tells wordpress to insert the child shortcode -->
  <?= do_shortcode($content); ?>

</div>
In the child element’s shortcode file
Write the behaviour of the child element here. The contents of this file can be similar to an independent shortcode
In the Parent element’s vc_template file
//vc_templates/vc_parent.php
<?php
  vc_map([
    //other parameters
    "as_parent" => ['only'=> 'child_shortcode'],
    "is_container" => true,
    "js_view" => 'VcColumnView',
  ]);

  if ( class_exists( 'WPBakeryShortCodesContainer' ) ) {
    class WPBakeryShortCode_ThemeName_Parent extends WPBakeryShortCodesContainer {
  }
}
In the Child element’s vc_templates file
//vc_templates/vc_child.php
<?php
  vc_map([
    //other parameters
    "as_child" => ['only'=> 'parent_shortcode'],
  ]);

  if ( class_exists( 'WPBakeryShortCode' ) ) {
    class WPBakeryShortCode_ThemeName_Child extends WPBakeryShortCode {
  }
}
Registering the shortcodes
<?php
//themeName_vc.php

  function add_shortcodes()
  {
    add_shortcode('themeName_parent', function($params, $content = null) {
      include(get_template_directory_uri() . '/shortcodes/parent.php') //replace parent.php with your shortcode's filename
    });

    add_shortcode('themeName_child', function($params) {
      include(get_template_directory_uri() . '/shortcodes/child.php') //replace child.php with your shortcode's filename
    });
  }


function configure_elements() {
  //register functions

  $this->configure_parent();
  $this->configure_child();
}

function configure_parent() {
  include(get_template_directory_uri() . '/vc_templates/parent.php')
}

function configure_child() {
  include(get_template_directory_uri() . '/vc_templates/child.php')
}
Working with Laravel Projects
1. Install Project Dependencies
composer install
2. Edit .env File
3. Compile Project Assets
npm run dev
or
npm run watch
4. Migrate Tables
php artisan migrate
Working with Git
Git
Installing git
Setting your git profile on your computer
git config --global user.name "Your Username"
git config --global user.email "[email protected]"
To verify if you have set your credentials correctly:
git config --global user.name
git config --global user.email
To cache your github password (for a default of 15 minutes):
git config --global credential.helper cache
Initiating git in a new project
In your project’s root directory:
git init
Cloning Files from the Git Repo
To clone using HTTP:
git clone https://github.com/code413/example.git
Adding a remote
git remote add https://github.com/code413/example.git
Removing a remote
git remote remove https://github.com/code413/example.git
Commit changes
In the same directory where you initiated git, run:
git add -A
git commit -m "Your commit message"
Check git status
git add -A
git status
Push changes
In the same directory where you initiated git, run:
git push
Pull changes
In the same directory where you initiated git, run:
git pull
Database
Refresh and seed database
php artisan migrate:refresh --seed